
Wednesday, 30 April 2014
Fantastic Voyage: Creative Partnership Archived
This is my creative partnership archived. I feel that the more we were into this project, the more challenges we've encountered. With the facebook page I've created for the 1st years, I believe that it has been helpful for everyone, if not most. Any problems we faced was put out there and help comes from anyone who knows the solution.This has definitely expanded beyond the creative partners we were assigned for this project :)
Monday, 28 April 2014
Ferntastic Indeed!
After emailing to 50 voice over artists and as I was not that willing to pay the cheapest quotation I got which was £80, FINALLY there were still people out there who were willing to do it for free. Not one, not two but THREE of them have agreed to help me :D
So here's the various narrators (including the original one) Any feedback on which voice over artist I should choose will be gladly appreciated! :)
So here's the various narrators (including the original one) Any feedback on which voice over artist I should choose will be gladly appreciated! :)
Indeed, good things come to those who wait and I am glad I did not give up on my search! :D
Saturday, 26 April 2014
Fantastic Voyage Final Animation
Fantastic Voyage: Sound Effects
Friday, 25 April 2014
Fantastic Voyage: Digital Set Concept Art
Figure 1 was my original idea of my digital set. It was simple and quite plain.
After the suggestions and feedbacks given, I went to rework on the concept art for the digital set and this is the end result.
 |
| Figure 1 |
 |
| Figure 2 |

Thursday, 24 April 2014
Thursday, 17 April 2014
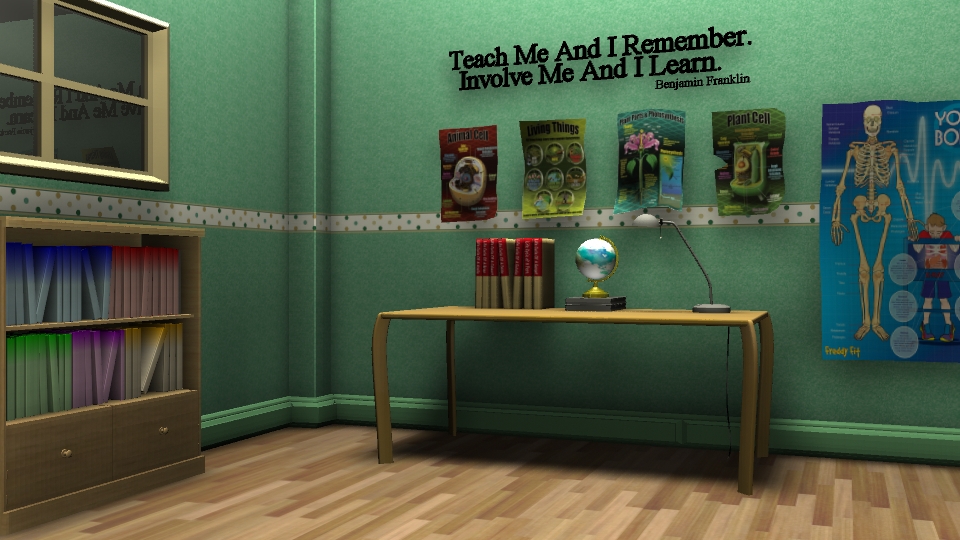
Fantastic Voyage: Texturing of Digital Set
This are the final images of my objects after they have been textured.
 |
| Study Desk |
 |
| Study Desk |
 |
| Bookshelf |
 |
| Bookshelf |
 |
| Layout of the Room |
 |
| Everything In The Digital Set |


Fantastic Voyage: UV Layout of Digital Set
Before I was able to place any textures on my objects in maya, I had to UV map them first. By doing so, I avoid any kind of distortion to my objects once I place the textures.
 |
| Books, Lamp, Globe, Trees and Ferns |
 |
| Books, Lamp, Globe, Trees and Ferns |
 |
| Wall Posters |
 |
| Bookshelf |
 |
| Bookshelf |
 |
| Layout of the Room |
 |
| Everything in the Digital Set |

Cutting Edge Film Programme: Gravity (2013)
 |
| Figure 1: Movie Poster [Still Image] |
The film revolves around a biomedical
engineer, Dr Ryan Stone and Matt Kowalsky, a veteran astronaut, who
were left stranded in space when their space shuttle, Explorer, was terribly damage by the debris caused from a Russian
missile that has been used to attack a dysfunctional satellite. The disastrous
strike left Stone tumbling in space, as she was detached from the space
shuttle. As she drifts further and further apart, she panics and Kowalsky had
to calm her down so that he could get her exact location and come to her
rescue. In order to go back to Earth, they used their thruster pack and made
their way to the International Space Station where a space shuttle awaits. When
they finally reached their destination, another set of debris made its
uninvited visit. It was after this that Ryan realized that she was on her own.
 |
| Figure 2: Debris Caused By The Russian Missile [Still Image] |
Unlike the title to this
film, nothing was rooted which includes the camera. By doing so, Cuarón has successfully allowed his audience experience what
it is like to be in space. A film critic, David Sexton, reiterates this point
when he states “The camera moves around constantly without any grounding, no up, no
down, no weight, no fixed points. It’s both disorienting and engulfing, not so
much a picture of what it is like to be out there in space as the very
experience of it.” (Sexton, 2013)
Not only did this film makes the audience
feel like they are physically in space but the emotional depth has been touched
upon successfully and are relatable. What this means is that the theme of despair,
loneliness and salvation are seen through Stone’s character as she faces multiple
challenges throughout the film.
This three themes are present in a particular
scene where she sits in the space shuttle’s cockpit, losing all her faith when
she is not able to get it running to travel to the Chinese Base. She sits
there, crying (despair) and turns off the lights and the radio when the Chinese
counterpart did not understand her (loneliness). As she drifts herself to
sleep, her subconscious mind had her think of Kowalsky who encourages her to be strong and she
has to have the will to survive(salvation). Geoffrey Macnab, a film critic,
summarises this point accurately when he mentions “It was simply to tell a story about human beings
dealing with adversity.” (Macnab, 2013)
 |
| Figure 3: Dr Stone Crying [Still Image] |
 |
| Figure 4: Dr Stone Hallucinating [Still Image] |
Like the captivating visuals, the sounds
played an important role in making it very believable. Kate Erbland summarises
the masterpiece precisely when she says ”An absolute technical marvel in every
way possible – from cinematography to special effects to sound design to score,
all of Gravity’s technical parts work together in perfect harmony for maximum
effectiveness when it comes to both the look and the feel of the film.” (Erbland,
2013)
List of Illustrations:
Figure 1 Gravity (2013) [Poster] at http://www.myreviews.it/wp-content/uploads/2013/09/100x140-drift.jpg (Accessed on 16 April 2014)
Figure 2 Debris Caused By The Russian Missile (2013) [Still Image] at https://s3-eu-west-1.amazonaws.com/front-media/assets/18/e8/94/f3/Gravity_472_16.jpg (Accessed on 16 April 2014)
Figure 3 Dr Stone Crying (2013) [Still Image] at http://img2.timeinc.net/ew/i/2013/10/14/Gravity.jpg (Accessed on 16 April 2014)
Figure 4 Dr Stone Hallucinating (2013) [Still Image] at http://i1.ytimg.com/vi/f46GwvQHmOs/0.jpg (Accessed on 16 April 2014)
List of Bibliography:
Erbland, Kate (2013) Gravity Review At: http://filmschoolrejects.com/reviews/gravity-review.php (Accessed on 16 April 2014)
Macnab, Geoffrey (2013) Gravity Review At: http://www.independent.co.uk/arts-entertainment/films/reviews/gravity-review-sandra-bullock-space-epic-makes-other-blockbusters-look-leaden-8927020.html (Accessed on 16 April 2014)
Sexton, David (2013) Gravity Film Review At: http://www.standard.co.uk/goingout/film/gravity-starring-george-clooney-and-sandra-bullock--film-review-8928399.html (Accessed on 16 April 2014)
Wednesday, 16 April 2014
Animation: Bouncing Ball
Tuesday, 15 April 2014
Animation: Bowling Ball
Basic Walk Cycle
Monday, 14 April 2014
Visual Effects: Render Layers (Mental Ray & Matte Passes)
 |
| Setting Up The Render Layers In Maya |
 |
| Bringing The Layers From Maya To Photoshop |
 |
| Plugging In The Matte Layers Under The Channels In Photoshop |
 |
| Final Image Composited In Photoshop |
Visual Effects: Depth Of Field
 |
| Before Any Camera Settings Were Changed In Maya |
 |
| Depth Of Field In Maya Cons: Too Long To Render, Grainy Effect |
The final render that has been composited in Photoshop and After Effects used images from Maya's render layers- The Beauty Pass And The Depth of Field Pass.
 |
| Depth Of Field In Photoshop, with Luminance added to the Alpha Channel Pros: Faster To Composite, More Control over the noise Cons: Single Image Composite |
 |
| Depth Of Field In After Effects Pros: Applicable For An Image Sequence |
Another method from Maya is by using render passes from the render settings. To do this, the camera depth from the tab passes under the render settings is associated to the layer named depth of field under the render layers (Channel Settings).
 |
| Settings |
 |
| Depth Of Field Using Camera Depth Pros: More Accurate In Comparison To Using Luminance Pass |
Visual Effects: Render Layers (Software Rendering)
 |
| Composited in Photoshop With A Single Render Pass From Maya |
 |
| Multiple Render Layers, Each Having Different Attributes |
 |
| The Different Passes From Maya Composited In Photoshop |
 |
| Final Image From The Compositing In Photoshop |
 |
| Compositing In After Effects |
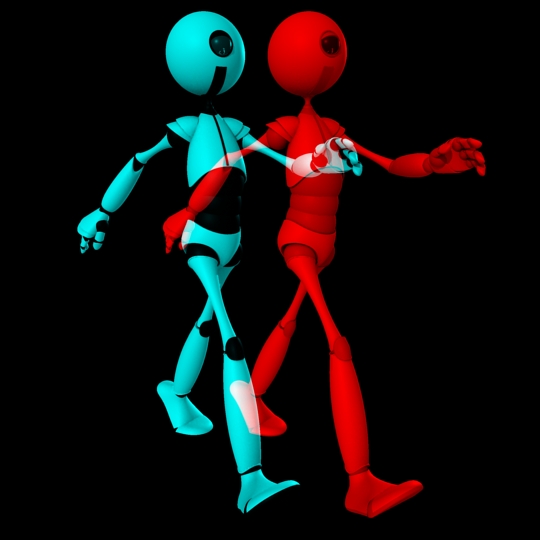
Visual Effects: Stereo Camera Rigs in Photoshop & After Effects
Method 1: Rendering Stereo From Maya
Method 2: Compositing in Photoshop
Method 3: Compositing In After Effects
The Outcome Of Using Different Effects In After Effects
 |
| Before Any Settings were changed in Maya |
 |
| Adding The Distance And Calculations |
 |
| Rendered Stereo Image From Maya |
 |
| Compositing In Photoshop |
 |
| Changing The Layer's Blending Mode To Achieve Final Result |
 |
| Final Composited Image From Photoshop |
 |
| Using Set Channels Effects |
 |
| Using 3D Glasses Effects |
Thursday, 10 April 2014
Fantastic Voyage: Wordings' Refinements
I've decided to add a bit of texture to my words that folds out to give it an extra edge of realism because it was too plain and too clean when there was not any.

Wednesday, 9 April 2014
Fantastic Voyage: Room(Digital Set) Refinements
For my digital set, I've gone to texture the bookshelf, added a glass texture to my window surface and shadows to the scene.
Currently, the glass seems to be too reflective and it looks more like a mirror. I am correcting that and in terms of the overall lighting, I am quite satisfied with it.
Subscribe to:
Posts (Atom)