
Showing posts with label Toolkit Photoshop. Show all posts
Showing posts with label Toolkit Photoshop. Show all posts
Wednesday, 30 April 2014
Friday, 25 April 2014
Fantastic Voyage: Digital Set Concept Art
Figure 1 was my original idea of my digital set. It was simple and quite plain.
After the suggestions and feedbacks given, I went to rework on the concept art for the digital set and this is the end result.
 |
| Figure 1 |
 |
| Figure 2 |
Thursday, 24 April 2014
Monday, 14 April 2014
Visual Effects: Render Layers (Mental Ray & Matte Passes)
 |
| Setting Up The Render Layers In Maya |
 |
| Bringing The Layers From Maya To Photoshop |
 |
| Plugging In The Matte Layers Under The Channels In Photoshop |
 |
| Final Image Composited In Photoshop |
Visual Effects: Depth Of Field
 |
| Before Any Camera Settings Were Changed In Maya |
 |
| Depth Of Field In Maya Cons: Too Long To Render, Grainy Effect |
The final render that has been composited in Photoshop and After Effects used images from Maya's render layers- The Beauty Pass And The Depth of Field Pass.
 |
| Depth Of Field In Photoshop, with Luminance added to the Alpha Channel Pros: Faster To Composite, More Control over the noise Cons: Single Image Composite |
 |
| Depth Of Field In After Effects Pros: Applicable For An Image Sequence |
Another method from Maya is by using render passes from the render settings. To do this, the camera depth from the tab passes under the render settings is associated to the layer named depth of field under the render layers (Channel Settings).
 |
| Settings |
 |
| Depth Of Field Using Camera Depth Pros: More Accurate In Comparison To Using Luminance Pass |
Visual Effects: Render Layers (Software Rendering)
 |
| Composited in Photoshop With A Single Render Pass From Maya |
 |
| Multiple Render Layers, Each Having Different Attributes |
 |
| The Different Passes From Maya Composited In Photoshop |
 |
| Final Image From The Compositing In Photoshop |
 |
| Compositing In After Effects |
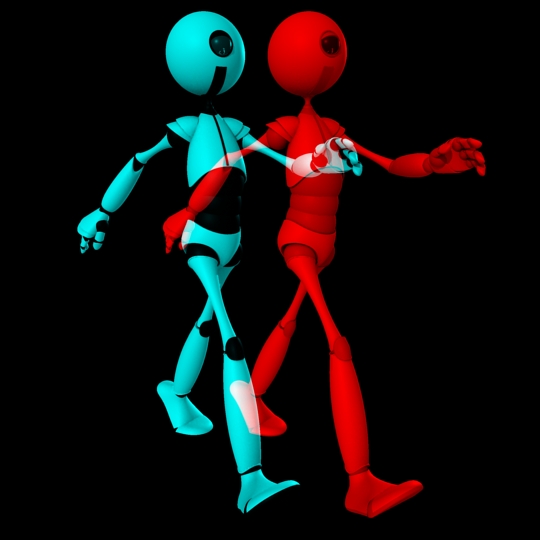
Visual Effects: Stereo Camera Rigs in Photoshop & After Effects
Method 1: Rendering Stereo From Maya
Method 2: Compositing in Photoshop
Method 3: Compositing In After Effects
The Outcome Of Using Different Effects In After Effects
 |
| Before Any Settings were changed in Maya |
 |
| Adding The Distance And Calculations |
 |
| Rendered Stereo Image From Maya |
 |
| Compositing In Photoshop |
 |
| Changing The Layer's Blending Mode To Achieve Final Result |
 |
| Final Composited Image From Photoshop |
 |
| Using Set Channels Effects |
 |
| Using 3D Glasses Effects |
Friday, 21 March 2014
Fantastic Voyage (Tree Texture Render)
After sucessfully bringing in the tree into Maya, I did a test in texturing my tree. I am pleased with how it looks like as it mirrors my concept.
 |
| With and Without Texture |
Fantastic Voyage (Tree Setup)
As I wanted to keep the same design of my trees which I have done for my animatics, I looked into tutorials on how to bring it into Maya. Now, I am left to put in the painterly textures on this 3D trees.


Thursday, 20 March 2014
Fantastic Voyage - Opening Scene PreViz
Fantastic Voyage - Opening Scene Set Up
I have done a basic model of the room where I will have my establishing shot for my animation. I had the man in there to give me a rough guidance of proportions.

Monday, 17 March 2014

Fantastic Voyage Animatics- Version 3
Sunday, 16 March 2014
Fantastic Voyage Concept 1- Final Development
I went to rethink of my concept to ensure that the style throughout the piece is consistent, I have decided to do a fold out light instead and changed the ground to be less textured and more painterly.
 |
| Concept 1 |
Thursday, 13 March 2014
Fantastic Voyage Animatic Shot 3
Fantastic Voyage Animatics (Opening/Closing Shot)
Fantastic Voyage Concept 1- Further Development
 |
| Concept 1 |
Tuesday, 11 March 2014
Fantastic Voyage Concept 1- Rethink
I went to rethink of my Concept 1 and after the feedback, I have decided to scrap the idea of trying to make it real because, afterall, it is a pop up book.

Subscribe to:
Posts (Atom)